A Leaking Water Effect using Paint.NET
by Rick Hargraves (aka, thegrindre)
Originally posted at http://www.geocities.com/thegrindre/ (now defunct)
Hi,
Yet another simple tutorial for the beginner by, yours truly. Paint.NET is a free graphics editor that
will do everything I want it to do when I want to 'manipulate' my texture files and, it doesn't cost
anything. It's a great little app.
Here's the latest link, as of this writing, and you'll need it to follow along with this tutorial. http://www.getpaint.net/
All my tutorials are as short and to the point as I can make them and, I don't plan to vary with this
one either so, do as I do and follow my lead and your work should come out as mine does.
My Paint.NET tutorials are just one way I do things and if you use a little imagination, you can apply
these techniques to other areas of your modeling.
Paint.NET has a slight learning curve, especially if you're used to something a lot easier such as, MS
Paint. Paint.NET requires you to do everything manually, one step at a time and, right below the letter
'S' in the word, Layers on Paint.NET's main tool bar area, is your Deselect Button. This button is your
best friend. You'll use it almost every time you perform an operation with Paint.NET. I'm going to
rename it to, DSB for an easier understanding throughout this and all future tutorials. Paint.NET
doesn't really have any defaults to fall back on, so to speak so, your DSB will be used a lot.
This tutorial is a very easy technique I use for making it look like water is leaking from a wooden
water tank. It uses two textures, one that looks dry and one that looks wet.
It's a simple process to pull your wet texture into Paint.NET, as your base texture and, the dry one as
a layer. Then, just start erasing the dry texture which exposes the wet one underneath. That's all there
is to it.
Want to try it?
Here's how...
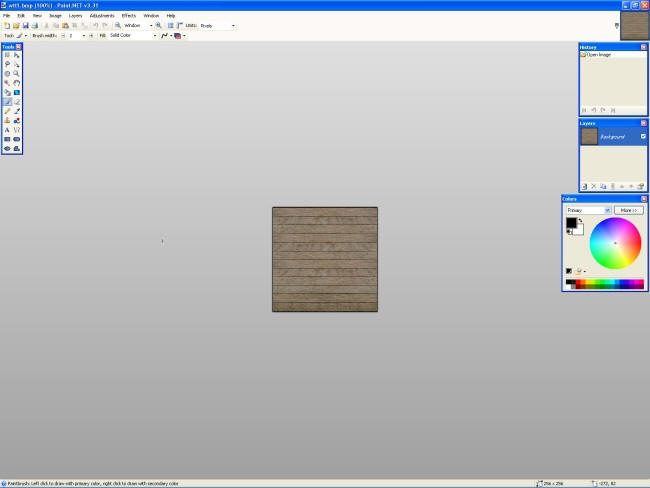
Find yourself the texture you want to use for the final overall dry water tank then right click on it,
choose, Open With, Paint.NET.
I'm going to call my two textures,
tankwooddry.bmp
tankwoodwet.bmp
You can name yours anything you want to.
Here's my tankwooddry.bmp and, yours should look similar as far as loading it into Paint.NET goes. Those smaller windows can easily be moved with your mouse pointer:
Now, we've got to make it look wet so let's look at Paint.NET's top tool bar area.

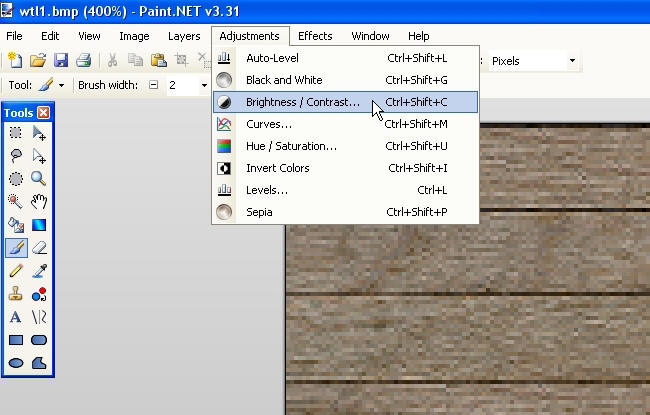
Right across the top are some pretty powerful texture tweaking utilities that can alter a texture most anyway you want to. We're going to use the Adjustments one to tweak our texture to make it look wet but first, let's blow it up so we can see what we're doing and we also need to copy it to our clipboard. We'll need it as a layer later.
Right under the word 'Window' there's a little magnifying glass thingy with a '+' in it.
Click it a few times to fill your window with your texture.
Now, save it to your clipboard. Go to Edit, Select All, then click the copy thingy, right under the
word, Image then hit the DSB, in that order, btw:
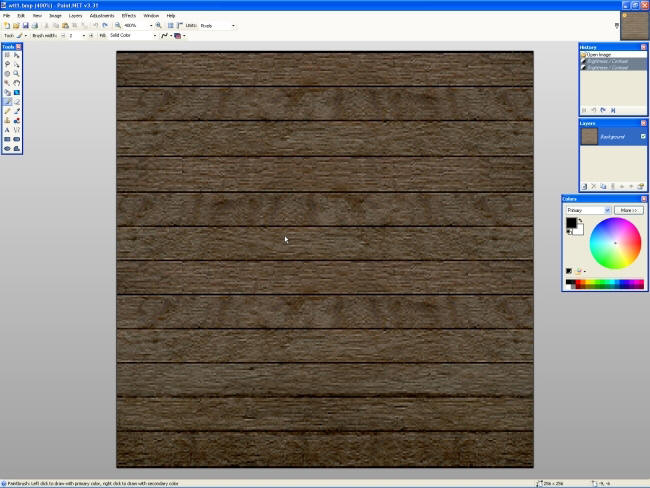
Notice that my texture is quite large now.
Go to, Adjustments, then click on, Brightness/Contrast. Another little window will open and those are
the adjustments you're going to use to make your base texture look wet.
The top one is the Brightness slider bar and that one will tone the brightness down to give your texture
a wet look. Go ahead and play with it until you've got the effect you're looking for. I used -50 for
mine but, yours may be a little different because all wood is not the same or you may just want it
different.
When you've got the 'wet look' as you want it, save it, just in case things go wrong so you will at
least have a back up of your wet wood texture.
Go to, File, Save As, then name it and save it.
You now have two textures, one that looks dry and one that looks wet and the dry one should also be on
your clipboard.
Mine looks like this:
We now have to get that dry wood texture active so we can start the cool effect. Go to your Little
Layers window and click on the little '+' button gizmo to open a new layer then, jump to the tool area
and click the paste button. It's below and in between the words, Image and Layers and, also click the
DSB. In that order, btw.
WOW! All I can see now is my dry wood texture again. That's a good thing because now comes the
interesting part, making it look like it's leaking water.
Go to the little Tools window and click the Eraser do-dad, it's about half way down on the right hand
side then start erasing just for the fun of it. Cool, huh? Don't forget, you can always undo anything
you don't like, one step at a time.
Now, look up at the tool bar area again and you'll see a Brush width adjustment. There's a '+' and a '-'
and a drop down arrow gadget. Play with those, too. After you get done playing around and you like what
you've done, you'll have to move the layer down to merge the two layers together as one then, save your
work as a third texture.
Here's a shot of the little Layers window showing the, New Layer and Move Down button gizmos.

OK, are you done? Happy with your work? Then let's wrap this thing up so we can test it. Go to your little Layers window and click the Move Down gizmo. That'll merge the two layers as one. Go to, File, Save As, and name your new texture then, save it.
Well, you now have three good working textures, a dry looking wood, a wet looking wood and the
combination of the two as a water stained or water leak texture look.
To test it, I leave Paint.NET opened but minimized then go and try it out. If you don't like yours, you
can always come back to Paint.NET, if you've left it opened and minimized. The undo tool will still
work, (That's those funny looking little blue arrows in the main tool area right under the word,
Adjustments, or the ones in your little History window.), and, you'll be able to continue to tweak it
until you get it right.
If you close Paint.NET down, your texture will be a 'done deal' and you'll have to start all over
again.
So... go give it a try.
After I got done playing around, I did this with my leaking water effect texture:
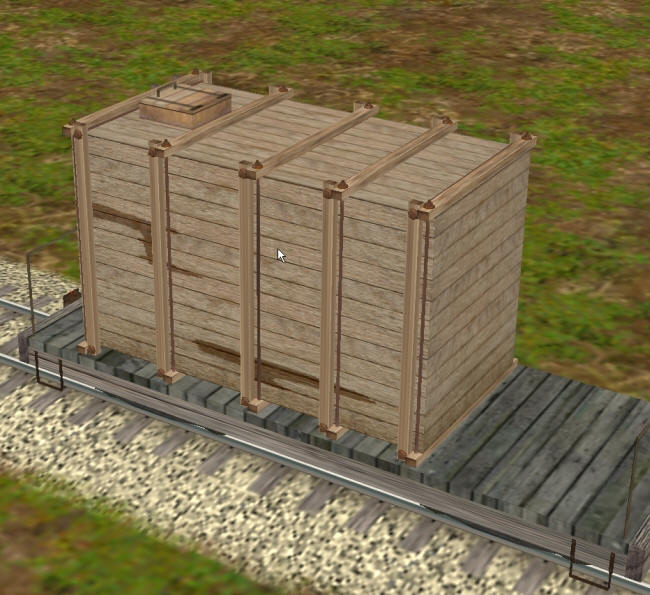
HINT: What I do to get an effect to look real, is run a Google search for similar effects photos, then try to mimic them as best as I can. There's nothing better then looking at the 'real thing' then, try to copy it.
Enclosed in my download version of the PDF file is my dry texture you can play with, too.
Have fun!
If you'd like to download this tutorial in Acrobat format, click HERE (745KB)!