Build a Basic Trainz Car in 3D Canvas (v. 7.1.2.0)
by Rick Hargraves (aka, thegrindre)
Originally posted at http://www.geocities.com/thegrindre/ (now defunct)
Hi,
I'm going to attempt to help you put a railroad car on the tracks for Trainz.
We're going to build one then export it so we may admire our work.
You will need the full blown version of 3D Canvas Pro and all of the latest plugins that go along with
it. It sells for about $70 and is a very powerful 3D application with some pretty good support.
I'm also going to try to keep this tutorial as short and as simple as possible.
This tutorial will be a 'hands on' and 'follow my lead' type of tutorial.
I thought this would be the best way to teach something when you just don't know diddly squat about
it.
So, it's going to be written for all of us 'Dummies' out there that are having troubles with this
issue.
I'm running Trainz Railroad Simulator 2004. (aka; TRS'04)
Enough said about that. Let's give this a try...
The really key factors involved are the hierarchy, the axis points and center.
If you don't follow these three things exactly, it'll never work in Trainz.
What you'll get, if you don't, is a railroad car that doesn't sit on the rails properly and most likely
will have that big red exclamation point above it.
So, open 3DC and drag a cube shape onto your scene. (I use a 100x100 foot working area with 1 foot dots
as guides. This makes my center, X=50 Y=0 Z=50. You can set your scene up anyway you want too.)
Dropping your Primitive cube in the blank section of your Perspective view, (3D view), will
automatically center it for you on the X and Z coordinate. I recommend doing it this way then, just
right click on the cube and click on the last option for Properties. Here you can enter your X Y Z as
necessary. Y must be zeroed, (Y=0).
NOTE: It has to be centered to your 3DC layout, (scene), with Y being at zero!
If your scene is a 25x25 working area then your center will be,
X=12.5, centered.
Y=0, centered.
Z=12.5, centered.
I can't stress this enough. It's a major key in getting your car on the tracks.
Pic 1 is my basic layout and how I use 3DC.
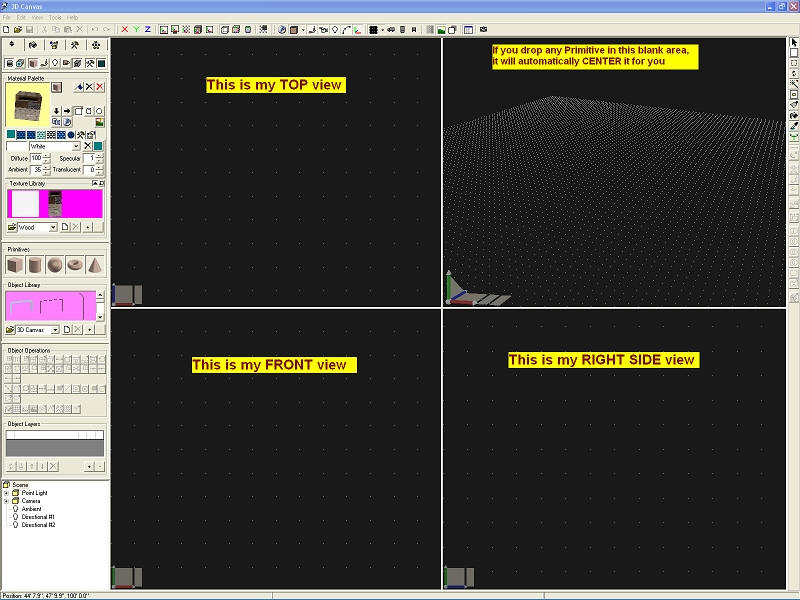
(Pic 1)
Pic 2 is the cube at dead center and it has been resized to the proper dimensions.
To resize the cube, right click on it, then left click, Scale, To Size.
This very simple flat car is, 7 feet wide, (X=7), 4 inches thick, (Y=.3333), and 20 feet long, (Z=
20).
NOTE: When you resize a primitive this way, 3DC will resizes it from it's dead center outward so, you
will not need to fool with centering it again. It will still be dead center for you.
It should look like this when you're done;
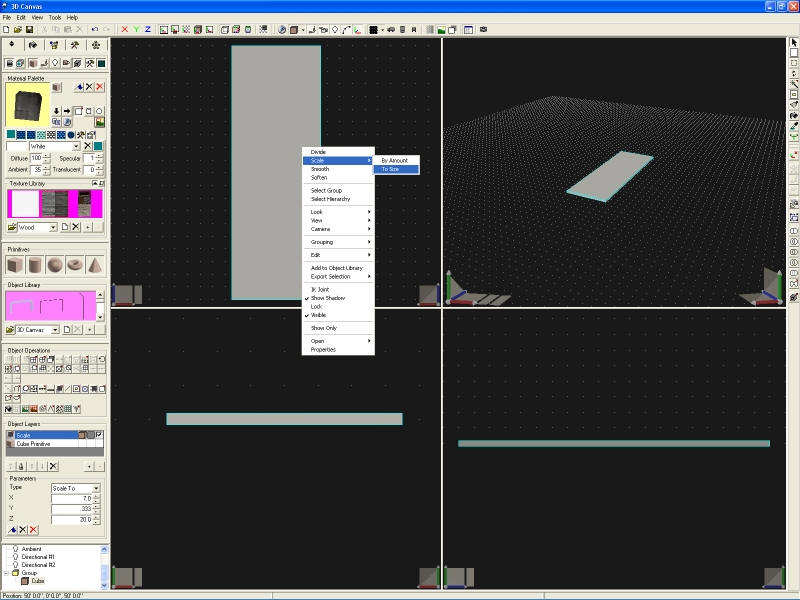
(Pic 2)
Let's throw a little color on it and see if it'll work. That's right, this is all you need to get a car
on the tracks... Well, it's the bare bones, anyway. Let me explain.
(Minimize 3DC for now, don't shut it down.)
You're going to need a Trainz folder, a config file and the files needed to get everything to
work.
3DC will supply everything needed except the folder and the config file upon export.
So, make a New Folder on your desktop and name it appropriately like this:

My kuid number is 371339. You should change this number to yours.
The 19999 number is the last number in the freight car range. You can use any number between,
15000-19999.
Now comes the config file. You are welcome to use mine to get you started. It's a very basic config file
and can be used for all of your future rolling stock, too.
(You will have to edit it accordingly as you add more cars to your collection.)
kuid <kuid:371339:19999>
name "Flat Car Tutorial"
origin "USA"
bogey <kuid:371339:1088>
enginespec <kuid:-1:42004201>
engine 0
mass 4000
category-region-0 "US"
category-era-0 "2000s"
category-class "XSU"
trainz-build 2.4
obsolete-table {
}
mesh-table {
default {
mesh "Flat Car Tutorial.im"
auto-create 1
effects {
0 {
kind "attachment"
att "a.couplera"
default-mesh <kuid:371339:60018>
}
1 {
kind "attachment"
att "a.couplerb"
default-mesh <kuid:371339:60019>
}
}
}
}
asset-filename "Flat Car Tutorial"
username "Flat Car Tutorial"
description "Flat Car Tutorial for 3D Canvas Pro."
author "thegrindre/steamdrivre"
organisation "All Rick's Stuff"
contact-email "thegrindre@yahoo.com"
contact-website "http://www.geocities.com/thegrindre/"
license "This is the flat car tutorial and you my do as you wish with it."
kuid-table {
0 <kuid2:63290:25011:2>
1 <kuid2:63290:25012:2>
2 <kuid:-1:42004201>
3 <kuid:371339:1088>
4 <kuid:371339:60018>
5 <kuid:371339:60019>
}
kind "traincar"
Copy and paste this into Windows NotePad and change that red kuid number to yours.
You will eventually have to change those green tags to whatever you name the car although, not
recommended at this time.
Now, save it as a config.txt file and drop it into your newly made Trainz folder.
Jump back into 3DC and export your work into this Trainz folder, too.OK, here's how.
- Right click on the yellow folder. It should read, Group
- Then click, Select Hierarchy
- Now, go to File, Export, Trainworks, Trainz Railroad Simulator (.im). Like this:
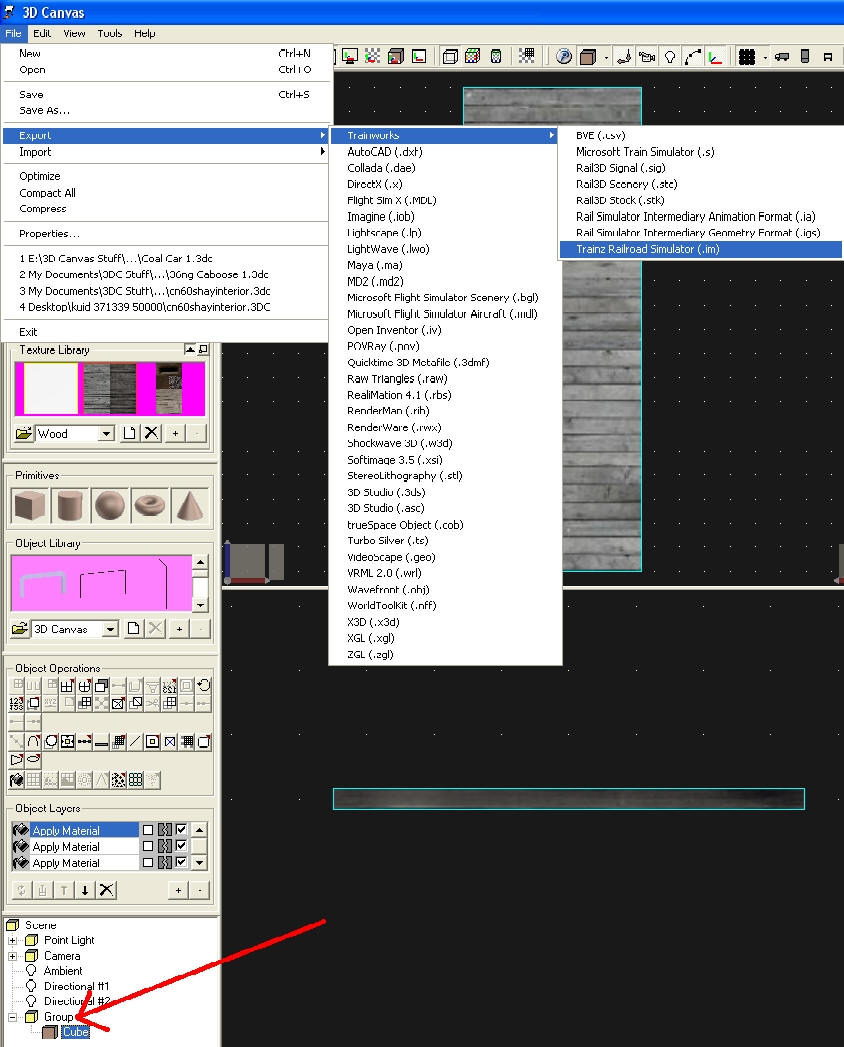
When that window opens, put your car's name in the blank space, click the second option, then the NEXT
button. (For now, I would maintain the name I'm using for this tutorial and keep it as, Flat Car
Tutorial. You can always change everything latter.)
Another window will open. Under, Output File, click the Change button and search for your newly made
folder then click OPEN. Now, click OK. Your done!
(Minimize 3DC again for now, don't close it down, just get it out of your way.)
Copy this whole Trainz folder you just put together into your Trainz directory.
IE: C:\Program Files\Auran\TRS2004\World\Custom\trains
Fire up your game and you should see something like pic 3.
(Pic 3)
Well, we got it on the tracks, that's for sure. It's dead center, too and if we couple a loco to it,
it'll pull it around but, there has to be more to it then just this...
Yup, there is. We have to raise it up BUT leave the axis points at dead zero while doing it and this is
one of the problems that most incur getting their car on the tracks.
Close the game and come back here when you're done.
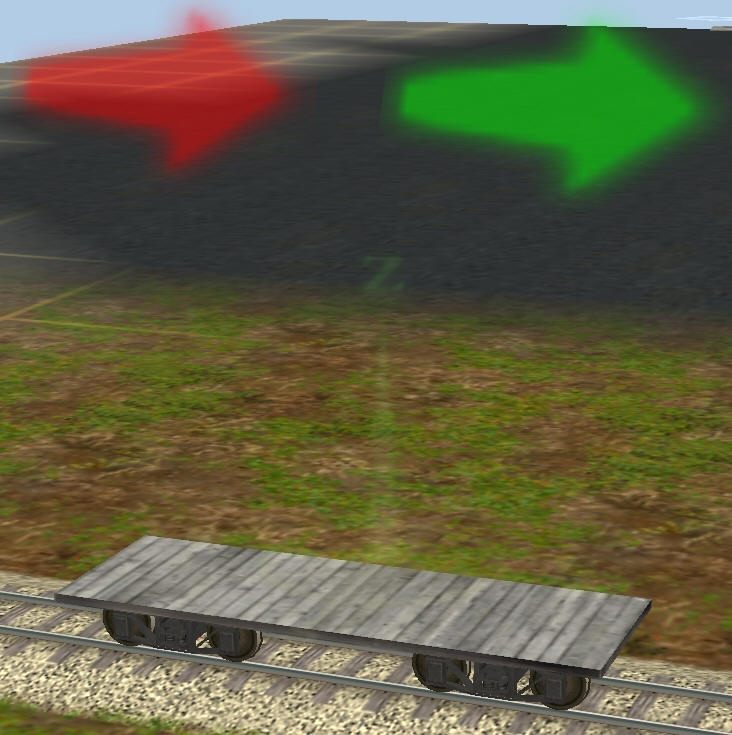
Let's raise it up.
Open 3DC again and lock out any movement on the X and Z axes first. Then use the shift button on the
right side of the interface to raise it up. Click and hold/drag on the object to raise it up 2.25 feet.
It will turn a transparent green when you click on it. If you move it up a little bit, you can then
enter an exact figure you want it moved to. Negative numbers are also acceptable but make sure the other
numbers are zeroed.
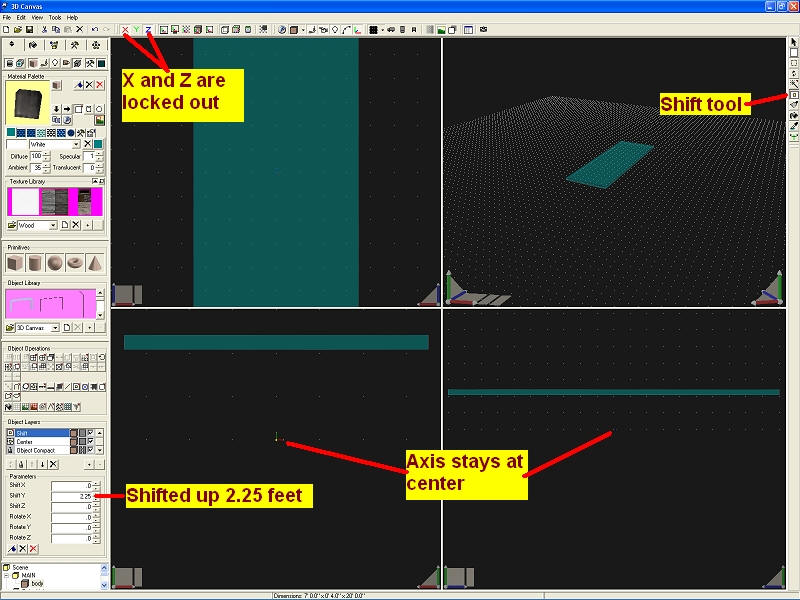
(Pic 4)
This is one way to move objects around while maintaining their defined axes and must be done for Trainz
to accept a railroad car.
You may now test this again in the game if you wish to see just what happened.
Go through the export routine then copy the folder as you did before.
Minimize 3DC to fire up your game again and take a look.
Close the game and come back here when you're done.
I've drilled into you the importance of center. I've shown you how to adjust an object while maintaining its axis point at dead center. Now comes the importance of the hierarchy and attachment points for Trainz because we gotta put wheels on this thing, now.
The little yellow Group folders and brown Cube boxes can have any name you want them to have. There are
exceptions when it comes to bogeys, though.
There must be a main folder at the top of the hierarchy to attach attachment points to. I call this
folder, MAIN. All additional added parts MUST go into this folder to be associated with the main part.
In this case, it is our body or flat bed we made here.
Let's name it. Click on the word Group and type, MAIN. Now, click on the word Cube and type, body.
Let's add two more parts for a little confusion. They will be the bolsters for the trucks we're going to
add in a little bit. Let's call them bolster1 and bolster2.
Drag two Primitive cubes onto your scene and name them. Not the Group folder but the Cube boxes like
this;
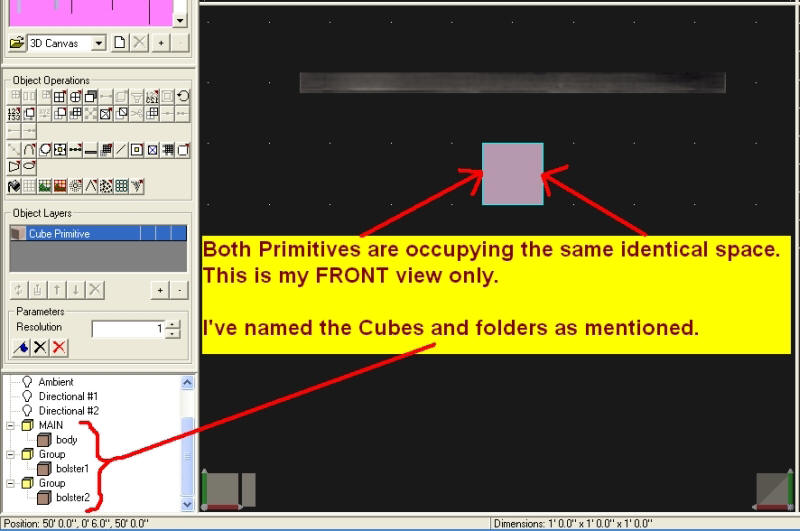
Let's resize them, add some color and move them, too.
Right click on the bolster1's brown box down there at lower left then click Scale, To Size. Enter X=2,
Y=.3333, Z=.3333. We now have a bolster that's 4 inches square by 2 feet long. Right click again then
Properties and move it on the Z axis 6 feet forwards.
(My scene would call for Z=56)
Repeat this for bolster2 but move it 6 feet backwards. (My scene would call for Z=44)
Now, drag and drop the brown box of bolster2 into the yellow Group folder of bolster1.
This will group multiple parts for moving them equally. We want to move them up to our main body on the
'Y' axis so, lock out 'X' and 'Z' and unlock 'Y' at the top of the interface.
You can right click on the yellow Group folder then click Properties and enter the exact 'Y' hight or
zoom in and eyeball them into place while dragging them upwards manually.
(Should be, Y=1.9169)
We now have three parts and want to attach the trucks/bogeys but our bolster Group is outside of the
MAIN folder so it won't work. Let's drag the bolster Group into the MAIN folder, attach our trucks and
see what happens.
The Trainz CCG says to attach our attachment points to the top of an object so, let's do that.
Click on the main body and not the bolsters as you might think. The bolsters could cause you nightmares
even though they are now directly associated with the main body.
This is another possible issue that may cause your car to fail in Trainz.
It's the hierarchy we want to maintain simply and clearly.
So, we're going to have to attach the bogeys to the main body then adjust the attachment points
accordingly. They will have to be zeroed just like the body was and set to the proper distance both
front and back.
Go to, Tools, Use Plugin, Trainworks, Trainz Railroad Simulator Attachment Points.
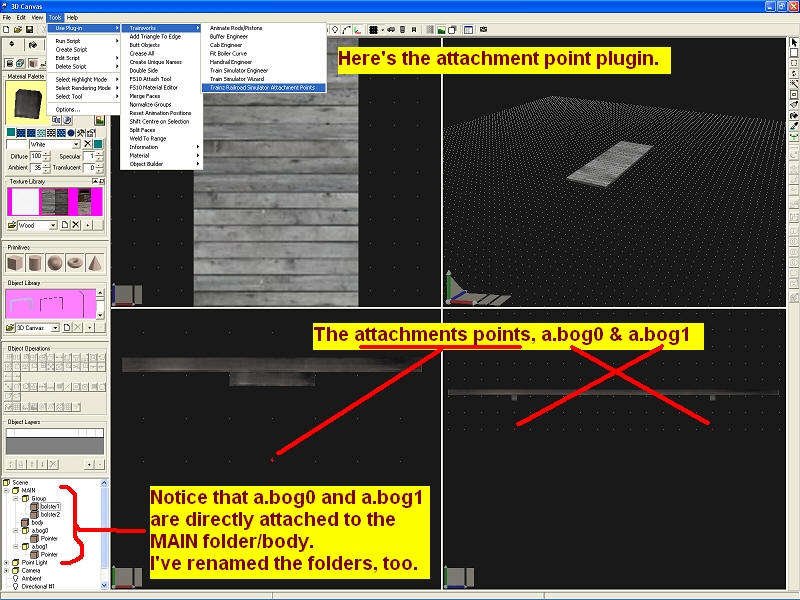
So, right click the brown Pointer boxes accordingly then Properties then enter X=0, Y=0, and Z will be a
positive 6 for the front truck while a negative -6 for the rear truck.
More hierarchy stuff. We got to rename these new Group folders and they've got to be right. The front
a.attach has to be renamed to, a.bog0 and the rear has to be renamed to, a.bog1.
This should do it so let's go see. Export your work as described above and I'll meet you back here when
you're done looking around.
It should look like this with those red and green arrows on top of each other.
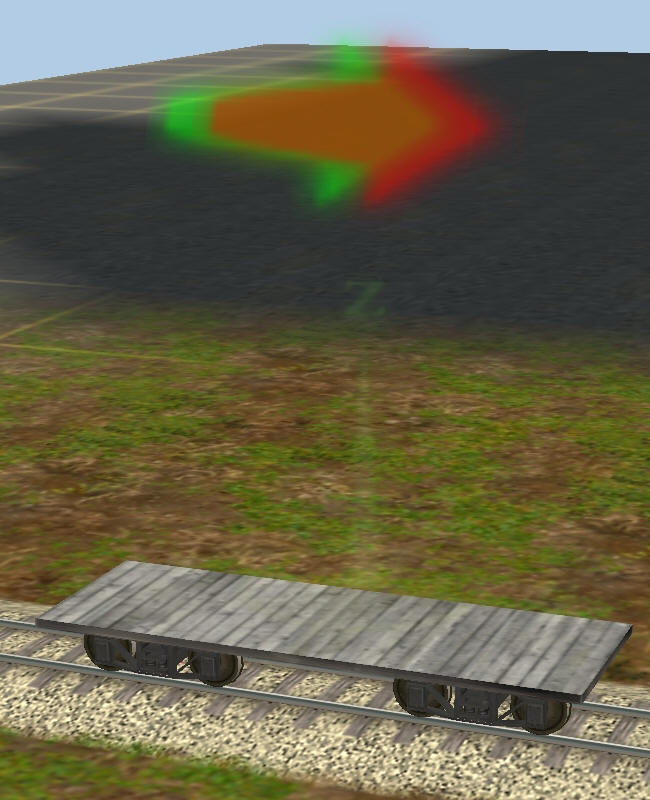
Well, we need two more attachment points to designate the boundaries of the car itself. These will make
it couple properly and act as it should in Trainz. They are the a.limfront and a.limback attachment
points. They are not as important in the hierarchy chain and can be attached to the end beam if we made
one or even the roof if it had a long overhang but, they will have to be adjusted outward depending on
your coupler placement. That's the catch on these and it usually takes a bit of trial and error to get
them the right distance away from the car.
Let's do that then look at our flat car again. I'll wait here till you get back. Go ahead and add the
attachment points just like you did for the bogeys and rename the yellow Group folders then adjust them
outward 1 foot past the car itself. The car is 20 feet long so a.limfront will be, Z=11 and a.limback
will be Z=-11. These attachment points do not need to be at Y=0 either.
Study this tree.
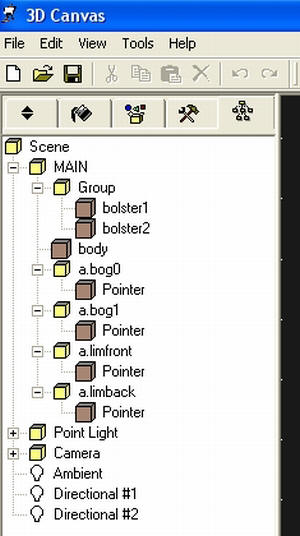
All attachment points have been attached to the MAIN body.
Notice the arrows now. This car will now act like a railroad car in Trainz.
(Pic 6)
That's it. I only hope this tutorial helped you understand the importance of,
- Center
- Axis points and their center
- hierarchy and how it works
Have fun!
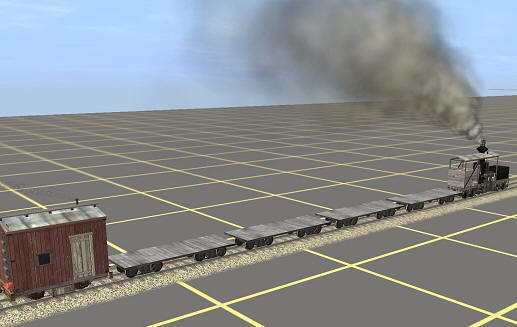
Hey, look at me! I'm pulling 4 of them...
If you'd like to download this tutorial in Acrobat format, click HERE (1MB)!
Enjoy!